
- UNSOLD at auction December 2023
- Built over a 6 year period
- Exact replica of the 1965 Monte Carlo Rally Winner AJB 44B
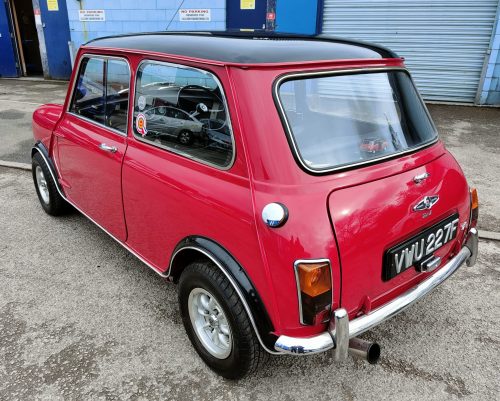
| MAKE | Austin |
| MODEL | Mini Cooper S |
| REGISTRATION | AJB 4B |
| ENGINE SIZE | 1275 |
| TRANSMISSION | Manual |
| CURRENT V5 | |
| COLOUR | Red |
| LOCATION | Battle, East Sussex, TN33 |
1965 Austin Mini Cooper S *Monte Carlo Rally Winner Replica*
Description
- UNSOLD at auction December 2023
- Built over a 6 year period
- Exact replica of the 1965 Monte Carlo Rally Winner AJB 44B
Paddy Hopkirk’s incredible victory at 1964 Monte Carlo Rally in a Mini Cooper began both Paddy and the Mini Cooper’s journey towards iconic status.
The following year, in 1965 Timo Mäkinen with co driver Paul Easter continued that success in AJB 44B. Their victory cemented the Mini Cooper’s legendary status.
This Mini Cooper, AJB 4B, is the result of six years painstaking work to recreate that 1965 winning Monte Carlo winning car.
We cannot do justice to how important and unique this Mini Cooper is. Nor can we provide the passion and emotion needed to describe this build. There is only one person that can, AJB 4B’s creator. He sets out below the astonishing story in sheer nut and bolt detail how this amazing Cooper has come together.
How to build a works rally replica in 6 years. The making of AJB 4B
See our lot gallery for part of the huge portfolio of images of this unique car
It all started in 1999 when I purchased LVW 881C Austin Cooper, with a view to transforming it into a Clubman type rally car. I was in Chris Spennewyns workshop where he had AJB 44B in for some running maintenance work for Gaydon museum where it was, and still is on display.
I sat in the driver’s seat imagining Timo Makinen and Paul Easter enduring the 2000 mile run in to Monte Carlo, then driving the special mountain stages, I felt nothing but admiration for these two men. At that point I knew I had to build more than a Clubman rally car, so with encouragement from Chris, a plot was hatched to build a full works replica.
This sounds easy on the face of it, but when I delved into the modifications the competitions had department installed, I knew it was not going to be an easy task.
In the meantime, the registration number AJB 4B was mentioned to me so this just had to be purchased from Norman Grimshaw.
First on the agenda was to find a replacement shell to replace the totally rotten one I had purchased. Chris Wooden of The Mini Shop had just the correct item, in the shape of a 50,000-mile late 1965 car which was in exceptionally good condition.
All the usual panels were replaced, o/s sill, front half of n/s sill. The rest was very sound and seemed a shame to disturb the original spotwelds. Front wings were replaced at the same time using Heritage panels. This work was carried out by Chris Spennewyn.
Chris had an original works aluminum bonnet skin, so this was duly purchased. I transported the shell to an old school bodyworker Pete Michelle who carried out the detailed panel work, fitting the aluminum panels. I had the bonnet skin, and managed to locate a pair of door skins which were duly fitted. The boot lid and inner door pockets were fabricated by a specialist, the boot lid in particular is a work of art and a testament to the fabricator’s skill, being hand formed from seven separate parts and welded together. Pete did a superb job fitting these panels and achieving lovely panel gaps.
Whilst this work was going on, I obtained permission from the curator of Gaydon museum to go over AJB44B for the fine detailed information I needed. So, armed with notebook, tracing paper, card, Vernier gauge, camera with spare battery, basic Mini photos and sandwiches I set out for Gaydon. I traced the position of the 2″ lightening holes on the rear seat base and backrest, the holes in the rear parcel shelf and the front dash top rail, plus the bonnet hinges. I measured the points of the fixings for the internal brake and fuel lines and transposed these to the basic photos I had printed out.
I measured the points of the quick lift jacking points, the positions and dimensions of the 700 fog lamp and 576 bonnet lamp brackets, the position of the Monte Carlo rally plates, distance of retaining pop rivets and the position of the Healey side light which is used as a reversing light. The position of navigators grab handle was noted, the position of the two washer bottles measured, the positions of the wheel braces on the rear parcel shelf, the position of the rear screen anti mist panel, as much detailed information as I could cram into a day, I did.
I set myself to transferring all my measurements to the body, plotting the lightening holes to their correct position then hand cutting each one with a hole die punch kit I purchased. Each hole was drilled for internal brake and fuel lines, I then made up the brake and fuel lines ready for fitment later on. I made the bonnet fog lamp mounts which I remember took me 6 hours to get the three different angles required for a snug fit. I made the drop-down brackets for the two 700 fog lamps and continental center driving lamp, all of which were converted to use halogen lamps as were the[SC1] [PC2] headlamps, while on the headlamps, the bezels are MGB type with a modified retaining clip for quick pull off removal rather than a Phillips screw which could be dropped in the snow.
The front panel was relieved to facilitate the fitment and removal of the Lucas 16ACR alternator. The front panel lower edge was cut and flattened to form a shelf for the oil cooler, this was reinforced with edge fillets welded for strength.
The oil cooler is the correct MGB unit with the correct part number and came from the stash of Nobby Hall, one of the Works mechanics, along with a large amount of original Lucas braided cable, used in the wiring loom. The oil cooler pipes are original reinforced works type supplied from Tim at Mini Mail along with sundry rare parts.
Access holes were cut in the rear of the seat back panel, to facilitate the removal of the shock absorber top mounting nuts, to avoid removing the petrol tanks to gain access, a job necessary after a few hundred miles of hard terrain.
The bottom of the inner wings was also relieved to get easier access for the front brake pipes where they meet at the brake light switch and the union on the nearside.
The quick release grille I modified from an Austin Cambridge Grille was cut to shape then bolts fixed to the front panel to accept quick release aluminum knurled buttons.
While this was all happening, Pete was hard at work preparing the body for its paintwork, this in total took close to 12 months, everything had to be just so before he would progress to the next stage.
Countless visits to autojumbles over the next two years, to Beaulieu, Gaydon, Stamford hall, Himley Hall, Shuttleworth, Knebworth, Stoneleigh, N.E.C. Birmingham etc. unearthed some of the rare parts needed for the build, along with meeting various people who would later supply parts they happened on which I needed.
One item, on talking to a stall holder at Beaulieu had a new boxed headlining kit for an early Austin 1100 in his loft, which was required as the build sheet decreed special headlining, door and rear pocket liners as this saved weight, a rare find indeed. Out of the blue Chris Wooden rang with the offer of a brand new boxed special tuning Perspex “glass” set, which was gladly purchased, he also had a heated front screen, although a later type with hidden buzz bars, this was swapped with Peter Valentine, along with a rev counter, for the correct type with visible buzz bars he had fitted to his rally car. I had to remove the old screen and refit the modern screen to his car, but it was another rare item I needed.
Peter Copestick also played a large role in parts supply, such items as works steering wheel, special buckles and adjusters for the seatbelts, to name but a few.
The wheel arches were a trial in themselves, I approached my nearby engineering college and with the help of the metalworking tutor I set them a project of fabricating the aluminum arches. This on the face of it sounds easy but when you see the curvature required along with the step which must be rolled into the material, then the slight radius differences from the front and rear wings, it was not straight forward. After two attempts, I was not really happy with the results. Enter Mr. Huckle. I can’t remember first name, he worked at John Coopers in the early days on the bodywork of the F1 cars so was an ideal person who understood what I needed. After 6 months of badgering and cajoling they were finally finished. He had to shrink and stretch the aluminum to get it to lay in the correct orientation. These were fitted, and I was pleased with the result.
The seats were made from ¾ inch steel tubing bent and welded to shape. The driver’s seat frame holding a fiberglass bucket remanufactured by Basil Wales, this had to be widened at the base to afford a comfortable seating position, this was carried out by a local motorcycle builder. I fabricated seat adjuster brackets to accommodate taller drivers. The navigator’s seat was made from ally sheet for the backrest and sheet steel for the base with lightening holes, a reclining mechanism was fabricated and the whole seat mounted on modified MGB runners.
I tried very hard to obtain the correct “pocter power” seat material but after endless calls, appeals in the Club magazine, sending samples to 5 different weaving companies, all to no avail, I had to compromise with the slightly later grey cord type trim sourced from Robert Young. The seats were trimmed by Fred Pound a local trimmer and sail maker. Thanks must go to Chris Spennewyn for the loan of his seats for detailed measurements.
With the body shell now fully painted it was time to look in to the wiring loom.
This work was entrusted to Garry Corpe, who has the original works drawings of the layout of the loom. Chris and I transported the car to Garry’s garage in Nottingham, where he explained to me that the loom had to be laid in the car strand by strand, terminated, then taped together. It has to be done in this way as the main loom is nearly an inch in diameter so if you tried to fit in a finished state, it would be like a steel bar and impossible to bend. This took nearly 3 months to complete but it was well worth the effort to have everything looking correct. The amount of detail involved is staggering, such as wiring two speed wipers controlled from the normal position, but also being available from the navigator’s door panel. Dimming for the Halda, wiring in the beautiful aircraft spec Plights with red bulbs, so as not to dazzle at night, to illuminate the Heuer clocks and oil pressure and water temperature gauges. Fitting horn button controlled by the navigator’s foot, even modifying MGB ignition switch as it had extra terminals.
With the car now returned from Nottingham it was time to fit the engine and transmission.
The engine was built to as near build sheet spec as I could with a few concessions for modern day driving conditions. The engine was bored 20 thou to achieve 1293cc with new pistons, big ends and main bearings, new bolts, timing chain and gears. This was connected to a lightweight flywheel with a competition clutch. The whole assembly was balanced by Gosnays Engineering of Romford. Peter Valentine set up the valve timing with offset woodruff keys. I made cotton reel spacers to stop the tappet rockers moving. The engine to gearbox mounting bolt holes were opened out to allow 5/16 unf allen headed bolts to be fitted for extra strength.
The 333-gearbox casing was fitted with a new special tuning straight cut gear set coupled to a Tran X cross pin diff. The assembly was fitted to the car. The fuel system used twin Jaguar SU pumps fitted to the rear subframe protected by an aluminum shield, these were wired so if one pump failed the wiring terminal could be easily swapped to the other pump. The carburetors were inch and a half SU H4 modified to fit the Mini inlet manifold, using roll pin dowels rather than the circular rings normally fitted. Fork and peg linkages were fitted for extra strength, air intake was by ram pipes. The twin fuel tanks had modern asbestos sheet protectors fitted to save possible damage by studded tyres, there was also a protector fitted to the boot floor to save the fuel tank, fuel pipes, from damage.
I made up an asbestos pad wrapped in aluminum sheet bolted to the firewall in the engine compartment to save heat transference from the manifold, an asbestos blanket was also fitted to the floor between the gear lever and dipswitch again to stop heat transfer as the exhaust system would get extremely hot.
The braking system was modified as per build sheet.
Using a new Lockheed servo I managed to find at Beaulieu. This was coupled to Cooper discs with new bearings, using herringbone Girling brake hoses all round, brake drums were drilled to aid cooling/ water draining, the handbrake cables were protected by shields I made, servo hose is original Lockheed yellow striped, and the handbrake I modified to fly off type. I modified the rear wheel cylinders by removing the roll pin and drilling out and tapping the hole to accept quarter UNF bolts which gave a much stronger mounting.
Brake lines, along with the fuel line, were laid internally affixed to the inner sills with Land Rover P-clips and rubber grommets.
Underbody protection was a key aspect of all the rally cars. The Monte Carlo was a relatively soft rally so the sump guard was a smaller light weight item than the usual guard. I made this from three sixteenth aluminum sheet with vent holes cut and formed to give the frontal curve, this was affixed to the front subframe using brackets I made and by, I think, Austin Healey engine mounting brackets at the rear of the subframe. The battery is protected by a steel guard I made from sheet steel fluted and shaped to fit the rear subframe by nuts and bolts and riv nuts. As I said earlier the fuel pumps were protected by a guard as were the handbrake/rear wheel cylinders.
The tie bar mountings were seam welded, as were the front subframe. The rear subframe was seam welded with steel sheet reinforcement plates welded to the bottom faces. An Austin Healey rear spring U bolt was welded in place for a towing eye.
Seat belts were made from original Irvin webbing for the main straps for the navigator’s harness, coupled to a GQ quick release buckle. This harness was sewn at the Irvin factory in Letchworth, prior to their closure, on their original machines. The driver’s harness was constructed with remanufactured webbing attached to an aluminum Irvin clasp type buckle with wider stomach pads.
This is a condensed version of the work carried out in the build. It has been a huge undertaking, but I am pleased to have achieved the result. Massive thanks must go to the people who have helped me along the way, without whom this car would never have been born.
My thanks to, Chris Spennewyn, Peter Valentine, Chris Wooden, Robert Young, Tim at Mini Mail, Peter Copestick, Paul Stanworth, Garry Corpe, Fred Pound, Pete Michelle, Gaydon Museum, Gosnave Engineering, Sue at F.D.T.S. for seatbelt assembly, Basil Wales, Paul Easter, Steve Eckersall, James Morrison, to name a few.
I hope AJB goes on to give pleasure to its future custodians, it certainly gave me pleasure creating it.
Robin Claydon
Our view
It is very rare we are lost for words. And any words we could find cannot really add anything to the fabulous narrative above.
What we do know, is that we are honoured to bring AJB 4B to the market. Like you, we also know AJB 4B represents a one-off opportunity to own a truly remarkable classic. Remember, this car hasn’t been made to just look like the Monte Carlo Rally winner of 1965, it’s an absolute, exact replica. Good luck!
Vehicle Location: Battle, East Sussex, TN33– it’s the responsibility of the winning bidder to make collection / transportation arrangements directly with the vendor.
Would like to arrange a viewing or have a question about this Ford Capri? Please contact us at team@evoke-classics.com and we will speak to the vendor on your behalf.
Related products
-
 Current Bid
 -
 Current Bid
 -
 Current Bid
 -
 Current Bid
